Room Forty
  • HOME
    • Contact >
      • About
      • Cakes and bakes
      • Blog
      • Media
  • Order delivery
  • Christmas
  • Vintage Crockery Hire
    • Terms and conditions
  • MENU CHOICES
    • Cream tea
    • Afternoon Tea
    • High Tea
    • Funeral Catering
    • Wedding Catering
    • Buffets and Bespoke
    • Tea
  • Baking Workshops

Cake, tea and me

Seeing Red

26/5/2016

0 Comments

 
Did you know that today is National red hair day? neither did I, but now I do I have the perfect excuse to celebrate and have a slice of this Red Velvet cake.

​This week I popped along to Warrington Clandestine Cake Club. It was great to taste so many different cakes and talk baking all evening!  Every CCC event has a theme and this one was 'fit for a Queen' in honour of Her Majesty's 90th year. This (picture)  was my rather over the top entry, but then, I do like a touch of drama on a Tuesday night and I did want to practice my chocolate work.
​
​A couple of people asked for the recipe so I thought you might like it too. It's well worth making, quite dense, rich and moist.

​I didn't use any food colouring as I try to avoid it if I can and the beetroot gave it a slight red hue, but perhaps a little should be in Red Velvet!

​This recipe was taken from the Step by Step cake decorating book by Karen Sullivan. ISBN: 9781409334811
 
Red velvet cake

​
You could stir in 1tsp of red colouring paste with the beetroot)
 
This makes a large 4 tier cake, really moist and decadent. Serves around 14.
 
2 x 20cm cake tines, greased and lined
 
3-4 medium beetroots (500g in total)
300g plain flour
50g cocoa powder
2 tsp bicarbonate of soda
½ teaspoon salt
175 g unsalted butter
275g brown sugar
200g caster sugar
3 large eggs at room temperature
2tsp vanilla extract
100g dark chocolate, broken into pieces and melted
150ml buttermilk mixed with 2tsp of cider vinegar (I used normal milk and 3 tsp of lemon juice instead)
 
Buttercream ingredients
 
250g unsalted butter
2tsp vanilla extract
600g icing sugar
200g cream cheese (drained)


Method
1.      Cook the beetroot in a pan covered with water for 30-40 minutes. Cool, then peel.
2.      Melt the chocolate over a pan of simmering water.
3.      Preheat the oven to 180 c
4.      Whizz the beetroot in a blender to make a puree, adding a little water if necessary.
5.      Sift together the flour, cocoa, bicarbonate and salt.
6.      In a separate bowl, whisk the butter, sugar, eggs and vanilla, then add the cooled, melted chocolate.
7.      Slowly add the flour mixture and the buttermilk mixture to the batter.
8.      Stir in 250ml of the beetroot puree and continue to mix.
9.      Divide the batter between the tins and bake for 35 minutes or until a skewer comes out clean.
10.   Leave to cool, slice in half and layer with buttercream icing if desired.
 
Buttercream method
1.      Cream butter and vanilla together with an electric whisk, add the icing sugar beating well
2.      Beat in the cream cheese
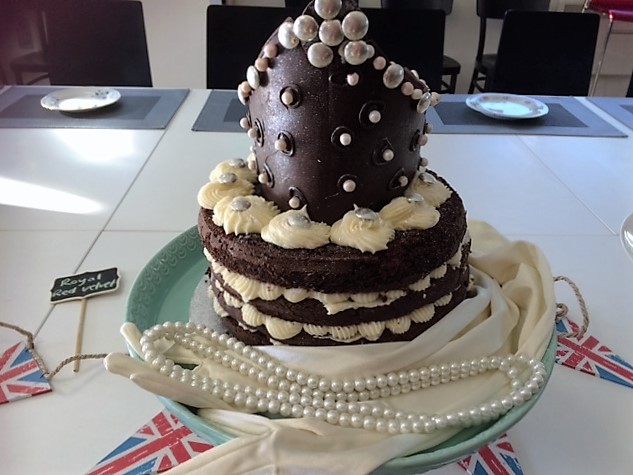


Picture
0 Comments

Real bread week - give it a go with this simple recipe

16/5/2016

1 Comment

 
Picture

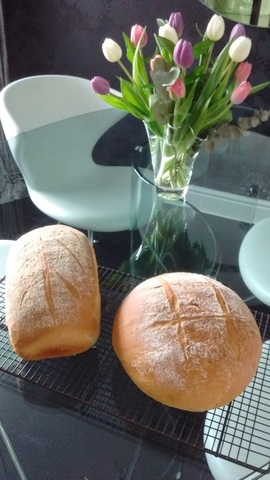
This week, as it is real bread week, I have asked my bread baking buddy Mitch Poole to guest blog. I did actually make this loaf myself last week, so I know the recipe works and is delicious! 

Nothing beats the taste and smell of fresh baked bread and as this week is national Real Bread Week I thought I’d share with you my favourite bread recipe.  Aside from real bread being additive free, it is also far more filling and sustaining than commercial bread. Just like baking a cake it takes a little practice, but it is well worth the effort. It’s also cheap, the materials cost around 40p for a large loaf.

Talking to fellow home bakers I’m often in awe at the level of baking skill that they possess and the astonishing projects that they take on. Their ambition seems boundless, except when it comes to baking bread, when a haunted look of fear appears in their eyes. I’ve never understood why this is so.

Once mastered it is easier to bake a loaf than a cake.

Bread dough is far more forgiving than cake or biscuit baking and less precise. It just takes a little practice, patience and a really good recipe. This is mine, it’s a really easy dough to handle because of the oil and makes a lovely tasty loaf.

Ingredients:
500g strong white flour
7g fast action yeast (or one sachet)
1 x tsp salt
180ml milk
70ml olive oil
100ml water (as a tip I always weigh the liquid 1 x ml is the same as 1 x gram)

Method
Take two large mixing bowls, lightly oil one and set it aside.

In the other weigh out your flour and place the yeast on one side of the bowl and the salt on the other (there’s method in this madness as salt can kill or retard the yeast at this stage).

In a measuring jug measure out your milk then heat it gently in the microwave for 50 seconds just to warm it up a little then add in your olive oil and water (in total you’ll then have 350ml liquid).

Return to the mixing bowl and with your fingers quickly mix together the flour, yeast and salt then pour the liquid into the bowl and stir it together with a mixing spoon until it start to come together.

Now it’s time to get messy – hold the bowl with one hand and get your other hand into the bowl and with your hand like a claw  start to drag and scrape the dough up and down in the bowl while mixing it together. The purpose of this is to start to create the gluten strands which will start almost immediately.

After a couple of minutes scrape the dough out of the bowl and start to knead it. Because of the oil in this dough it shouldn’t be too sticky so there shouldn’t be a need to flour the work top. 

Once the dough has come together, it starts to look glossy and has formed a ball place the ball of dough into the clean, lightly oiled bowl and either place a plate on the top or clingfilm and leave it to prove.

You now need to wait until the dough has doubled in size. This is dependent on how warm your room is but it should take between an hour…or two, so wash up, do other things and make a cuppa.

Once doubled in size you now need to knock back the dough. Basically this is kneading again for a couple of minutes to push the air out of it. 

It now depends how you want to shape your loaf. If you wish to make a round free form loaf, shape the dough into a ball and put it on a baking sheet (try tucking it around, so that the seam sits underneath the dough) (I place a mixing bowl over the top to help it prove) 

Or, shape the dough into a rugby ball shape and put it into a large loaf tin, greased with butter and cover with lightly oiled cling film.

Put your oven on and set to 200 degrees.

Your dough will now rise relatively quickly. Once it has again doubled in size, remove the clingfilm or bowl, dust the top in flour and pop in the oven. The baking smell will be divine!

Set your timer for 22 minutes for a round loaf, or 29 for the tin loaf and test them at this stage. To test if it is baked, with oven gloves on of course, remove from the tin or tray and tap it on the bottom. It should sound hollow or drum like. If it isn’t ready chuck it back in the oven for 3 or 4 minutes. 

Once removed from the oven place on a cooling tray to cool. Though tempting to eat it hot, don’t. The bread won’t cut properly and it can also lead to indigestion attributed to IBS.

1 Comment

    Author

    Jen Perry; loves discovering beautiful vintage china, eating cake and drinking proper tea.

    Archives

    February 2022
    September 2021
    May 2021
    April 2021
    September 2020
    August 2020
    June 2020
    May 2020
    April 2020
    March 2020
    January 2020
    May 2019
    April 2019
    February 2019
    November 2018
    October 2018
    August 2018
    June 2018
    February 2018
    November 2017
    October 2017
    August 2017
    June 2017
    March 2017
    February 2017
    January 2017
    November 2016
    August 2016
    July 2016
    June 2016
    May 2016
    April 2016
    March 2016
    February 2016

    Categories

    All

    RSS Feed

MenU

Cream Tea Afternoon Tea High Tea Canapes

ROOM FORTY

About
The Blog
Media

More Information

Contact
Subscribe to our newsletter
Terms of Use
© COPYRIGHT 2015. ALL RIGHTS RESERVED.
  • HOME
    • Contact >
      • About
      • Cakes and bakes
      • Blog
      • Media
  • Order delivery
  • Christmas
  • Vintage Crockery Hire
    • Terms and conditions
  • MENU CHOICES
    • Cream tea
    • Afternoon Tea
    • High Tea
    • Funeral Catering
    • Wedding Catering
    • Buffets and Bespoke
    • Tea
  • Baking Workshops